Picture this: A customer in Mumbai orders your product at 11 PM on a Tuesday. Within 10 minutes, it’s at their doorstep. Not 10 days like traditional ecommerce. Not even 10 hours. Exactly 10 minutes.
This isn’t science fiction. It’s quick commerce, and it’s transforming how Indian consumers shop for everyday products. The market is projected to reach $9 billion by the end of FY25 and is expected to surpass $26 billion by FY28, growing at a staggering 73% CAGR. For brands selling consumer goods, this represents an opportunity that simply didn’t exist five years ago.
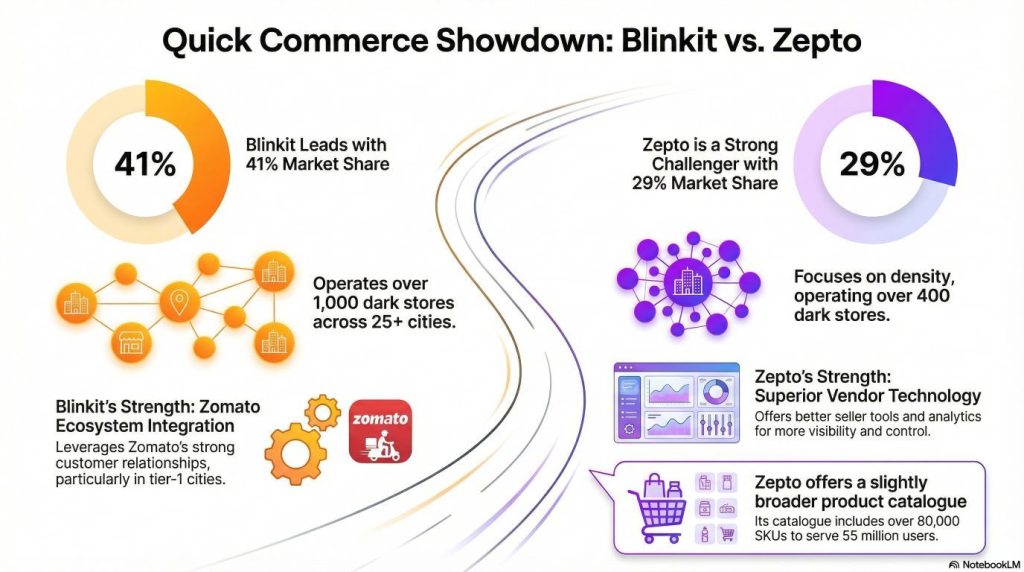
Blinkit currently operates in more than 25 cities with around 1,000 dark stores and aims to set up 1,000 more by the end of 2025. Zepto has over 400 dark stores covering 10,000+ pin codes across India, reaching 55 million customers. These aren’t just numbers—they represent millions of potential customers who can receive your products within minutes of deciding they want them.
But here’s what catches most brands off guard: selling on Blinkit and Zepto is fundamentally different from selling on Amazon or Flipkart. You’re not just listing products on a marketplace where customers browse and buy. You’re becoming a supplier to a sophisticated network of micro-warehouses called dark stores, each operating like a hyper-local fulfillment center optimized for 10-minute delivery.
The registration process is more complex, the documentation requirements are stringent, and the operational demands are different. Many brands start the process with enthusiasm, only to get stuck on APOB registrations, confused by Category Manager discussions, or frustrated by inventory allocation complexities. This comprehensive guide walks you through exactly how to become a vendor on both platforms, from initial registration to scaling your quick commerce sales.
Understanding Quick Commerce: How the Model Actually Works
Before diving into vendor registration, you need to understand the fundamental difference between quick commerce and traditional ecommerce. This isn’t just faster delivery—it’s an entirely different business model with different economics, different inventory management, and different customer expectations.
The Dark Store Revolution
Traditional ecommerce platforms like Amazon and Flipkart operate from large centralized warehouses. When a customer orders something, it ships from a warehouse that might be hundreds of kilometers away. The order takes 2-7 days to reach the customer. This model works fine for planned purchases where customers can wait.
Quick commerce operates on a completely different principle. Instead of centralized warehouses, these platforms use networks of dark stores. A dark store is essentially a micro-warehouse located in residential neighborhoods, typically 2,000-4,000 square feet in size, stocking 2,000-3,000 SKUs of the most in-demand products in that specific locality. These aren’t customer-facing retail stores. They’re purely fulfillment centers with no showrooms or browsing areas.
Here’s how the model works in practice. A customer opens the Blinkit or Zepto app and sees products available from the nearest dark store, usually within 2-3 kilometers of their location. The order is automatically routed to that specific location. An employee in that dark store picks the items from shelves and packs them within 2 minutes—the entire layout is optimized for picking speed, not customer browsing. A delivery partner waiting at the store picks up the order and delivers it to the customer within 10 minutes.
This model requires different thinking from suppliers. You’re not shipping individual orders directly to customers. You’re maintaining inventory across dozens or hundreds of dark stores simultaneously. When a dark store’s inventory of your product runs low, it needs replenishment quickly. The platforms use sophisticated demand forecasting to predict what each dark store will sell and generate purchase orders accordingly. Understanding this operational reality is crucial before you start the vendor registration process.
Blinkit vs Zepto: Understanding the Players
Both platforms dominate the quick commerce space, but they have different strengths and market positions that affect your vendor experience.
Blinkit, owned by Zomato, currently holds the largest market share at 41%. The platform operates over 1,000 dark stores across 25+ cities and achieved an annualized gross merchandise value of ₹142 billion. The company is aggressively expanding and plans to double its dark store network by the end of 2025. Blinkit’s strength lies in its integration with Zomato’s ecosystem, particularly in tier-1 cities where Zomato already has strong customer relationships. The platform handles around 1.6-1.7 million daily orders and has built sophisticated logistics infrastructure.
Zepto takes a different approach. With a 29% market share, it operates over 400 dark stores but focuses on density rather than breadth. The platform covers 10,000+ pin codes and has built a customer base of 55 million users. Zepto’s catalog includes over 80,000 SKUs, making it slightly broader than Blinkit in product range. The company’s technology platform is particularly strong, with better seller tools and analytics that give vendors more visibility and control.
| Key Differences | Blinkit | Zepto |
|---|---|---|
| Market Share | 41% (largest) | 29% (second largest) |
| Dark Stores | 1,000+ (expanding to 2,000) | 400+ |
| Seller Experience | Category Manager-driven | Self-service Seller Hub |
| Onboarding Time | 45-60 days | 30-45 days |
| Payment Cycle | Bi-weekly | Weekly |
From a vendor perspective, both platforms require similar documentation and follow similar onboarding processes. The key differences lie in the commercial terms negotiated with each platform, the level of promotional support expected, and how much control you have over your product listings.
What Products Actually Sell in Quick Commerce
Quick commerce started with groceries, but the category mix has evolved dramatically. Understanding which products work best helps you plan your catalog strategy and set realistic expectations.
Core high-velocity categories include groceries and staples like rice, dal, atta, cooking oil, and spices. These are regular purchase items that customers need urgently when they run out. Fresh produce including fruits, vegetables, and herbs drives significant volume, though managing shelf life becomes critical. Dairy products like milk, yogurt, paneer, and cheese sell extremely well because customers need them fresh and frequently. Bakery items including bread, buns, cakes, and cookies are impulse purchases that benefit from quick delivery.
The personal care category has emerged as a major growth driver. Products like toothpaste, shampoo, soap, face wash, razors, and sanitary napkins are regular purchases that customers appreciate having delivered quickly. The convenience of not running to a store when you realize you’re out of toothpaste drives strong repeat purchase behavior. Similarly, snacks and beverages represent another high-velocity category where chips, biscuits, namkeen, chocolates, cold drinks, and packaged juices sell well as impulse purchases.
Emerging opportunities lie in category expansion. Electronics accessories like mobile chargers, earphones, and cables are being tested successfully. Fashion items including basic innerwear and loungewear are appearing on platforms. Pharmacy products represent a major focus, with platforms adding over-the-counter medicines, health supplements, and wellness products. These categories are expected to drive the next leg of GMV growth.
What doesn’t work well in quick commerce, at least not yet, are products that require inspection before purchase. Large appliances, furniture, and high-value electronics needing detailed evaluation don’t fit the quick commerce model. Products with very long consideration periods where customers research extensively before buying also don’t convert well in a 10-minute delivery context.
Who Can Become a Vendor? Eligibility Requirements
Not every business can become a vendor on quick commerce platforms. Both Blinkit and Zepto have specific eligibility criteria designed to ensure product quality, consistent supply, and legal compliance. Understanding these requirements before you start the registration process saves time and prevents rejection.
Business Types That Qualify
Established FMCG brands represent the core vendor base on both platforms. Companies like Nestle, Hindustan Unilever, Britannia, Parle, and ITC already supply to Blinkit and Zepto. If you’re an authorized distributor of these brands, you can potentially become a vendor by providing proper brand authorization letters.
Direct-to-consumer brands selling consumer packaged goods are increasingly welcome on quick commerce platforms. D2C companies making snacks, beverages, personal care products, organic foods, health supplements, or household items can apply. Platforms actively seek differentiated products that aren’t available in traditional retail, as these help them stand out from competitors.
Local manufacturers producing consumer goods for retail distribution qualify if they meet quality standards and can maintain consistent supply. Whether you manufacture spices, pickles, bakery products, household items, or personal care products, you can apply as long as you have proper business registration and product compliance certifications. Regional distributors and wholesalers serving retail stores can become vendors, particularly for fresh produce, dairy, meat, and chicken.
⚠️ Who cannot apply:
Individual sellers without business registration, resellers without proper authorization from brands they want to sell, businesses without GST registration in categories where it’s mandatory, and suppliers who can’t maintain consistent daily supply to multiple locations simultaneously won’t be accepted.
The Non-Negotiable Requirements
ꪜ Business registration is the foundation. You must be a legally registered business entity—a sole proprietorship, partnership, limited liability partnership, or private limited company. Individual sellers without formal business registration cannot apply. Both platforms verify your business registration certificate during the documentation phase, and any discrepancies result in immediate rejection.
ꪜ GST registration is absolutely mandatory. Your GSTIN must be valid and active, and the platforms verify it directly with the government portal. Any inactive registration causes immediate rejection. But here’s where it gets more complex: you need GST registration not just in your home state, but in every state where you want to supply products. This brings us to the critical APOB requirement.
APOB stands for Additional Place of Business, and it’s a GST concept that becomes critical in quick commerce. If you want to supply dark stores in multiple states, you need separate GST registration for each state’s warehouse location. For example, if you’re based in Delhi but want to supply Blinkit’s warehouses in Mumbai and Bangalore, you need APOB registrations for Maharashtra and Karnataka. This process takes 2-4 weeks per state and must be completed before you can supply those locations. Many first-time vendors underestimate this requirement and face significant launch delays.
Product compliance requirements vary by category but are strictly enforced:
- FSSAI license is mandatory for all food and beverage products without exception. Your FSSAI license must cover the specific categories you’re selling
- Quality certificates are required where applicable (ISI marks, BIS certification, or other quality standards)
- Brand authorization letters become critical if you’re not the brand owner—you need explicit permission on official letterhead
- Product liability insurance isn’t always mandatory but is increasingly recommended
Beyond legal requirements, you need operational capability to meet quick commerce demands. The most critical factor is your ability to maintain consistent inventory across multiple locations simultaneously. Quick commerce doesn’t work with occasional supply. If you can’t ensure daily availability of your products across the dark stores where you’re listed, the platforms won’t onboard you. You need buffer inventory capacity to handle demand spikes, quality consistency where every unit meets standards, and shelf life management ensuring products have minimum 3 months of remaining shelf life when supplied.
How to Sell on Blinkit: The Complete Registration Journey
Blinkit’s vendor onboarding process is more structured and takes longer than traditional marketplaces. The platform doesn’t allow self-service registration where you immediately get dashboard access. Instead, you go through a multi-stage approval process involving documentation verification, commercial negotiations, and technical onboarding. Let me walk you through each stage with realistic timelines and expectations.
📌 Stage 1: Initial Application and Category Manager Assignment
Your journey starts at the Blinkit Partner Registration page. Visit the Blinkit website, scroll to the bottom footer, and click on “Sell on Blinkit” or “Partner with Us.” The initial form is relatively simple—provide your business name exactly as it appears in your GST certificate, enter your contact details including mobile number and email address (both verified with OTP), and select your product categories from the dropdown menu. Be specific here because this determines which Category Manager reviews your application.
Unlike Amazon or Flipkart where you get immediate dashboard access after basic verification, Blinkit’s process is different. Once you submit the application, it goes into a review queue. The platform’s vendor acquisition team reviews applications based on current category priorities, supply needs in specific cities, and brand fit. This initial review typically takes 3-5 business days.
If your application passes initial screening, you receive an email notification that you’ve been assigned to a Category Manager. This person becomes your single point of contact throughout the onboarding process and often continues as your account manager after you start selling. Think of them as your guide through Blinkit’s ecosystem—they understand what works on the platform, which products are in demand, and how to structure deals that work for both sides.
The Category Manager will reach out via email or phone to schedule an introductory discussion. During this conversation, expect questions about your business history, current distribution channels, production capacity, product range, and which cities you can supply. They’re evaluating whether you’re a good fit for their platform and whether your products align with current growth priorities.
Come prepared with specific numbers: your current monthly production volume, how much inventory you can commit to Blinkit, your growth plans, and which cities you have distribution capabilities in. This is also your opportunity to ask questions about what the Category Manager is looking for, which of your products they think will perform best, what commercial terms typically apply to your category, and what the realistic timeline looks like for getting your products live.
📌 Stage 2: Documentation Submission and Verification
After the initial discussion, your Category Manager will send a detailed documentation checklist. Blinkit is particular about documentation format and quality—incomplete or poor-quality documents are the number one reason vendor applications get delayed or rejected.
Business documentation requirements:
Your business registration certificate must be clear and complete. If you’re a proprietorship, provide your Shop and Establishment license or GST registration certificate. Partnerships need the partnership deed. LLPs and private limited companies need incorporation certificates. Make sure the business name on all documents matches exactly—even minor variations like “ABC Enterprises” versus “ABC Enterprise” cause issues.
The GST certificate is critical. Provide your GSTIN certificate downloaded from the GST portal, and it must show active status. If you have APOB registrations in additional states, provide those certificates as well. Even if you don’t have APOB registrations yet, inform your Category Manager which states you plan to supply so they can guide you on the process.
PAN card documentation needs both business PAN and personal PAN of the proprietor, partner, or director. Provide clear scans of the actual PAN cards, not photocopies of photocopies. Bank account proof requires three things: a bank statement from the last 3 months, a canceled cheque clearly showing your account number and IFSC code, and a bank account certificate on bank letterhead. Make sure the bank account is in the business name, not a personal account.
Product-specific compliance:
FSSAI license is mandatory for food products. Provide the complete FSSAI certificate showing your license number, validity dates, and covered categories. The certificate must be current with at least 3 months of validity remaining. Brand authorization letters must be on the brand owner’s official letterhead, dated within the last 6 months, explicitly stating that your company is authorized to sell their branded products on ecommerce and quick commerce platforms.
Product images are just as important as legal documents. Provide high-resolution images of each SKU you want to list. You need front-facing product shots, back-facing shots showing ingredients or specifications, nutritional information panels, and images of all sides of the packaging. Images should be well-lit, in focus, and shot against plain white backgrounds. Poor product photography leads to rejection or low sales even if you get approved.
Critical formatting requirements: All documents must be in PDF format, clearly readable, and under 5MB each. Blurred documents, photos of physical documents taken in poor lighting, or rotated PDFs that require tilting your head to read cause automatic rejection. Upload documents through the portal link your Category Manager provides, following the naming convention requested.
📌 Stage 3: Commercial Negotiations That Determine Your Profitability
Once your documentation is verified, the real negotiations begin. Your Category Manager schedules a detailed discussion about commercial terms. This conversation determines your profitability on the platform, so prepare carefully.
Commission percentage is the first major negotiation point. Blinkit’s commission varies by category, typically ranging from 10-20% of the selling price:
| Product Category | Typical Commission Range |
|---|---|
| Groceries & Staples | 10-12% |
| Personal Care & Beauty | 15-18% |
| Snacks & Beverages | 12-15% |
| Electronics (high-value) | 5-8% |
| Electronics (accessories) | 12-15% |
The commission is negotiable based on your brand strength, product uniqueness, and volume commitments. Established brands with strong market presence typically negotiate 2-3% better rates than new or regional brands.
Beyond base commission, you’ll discuss promotional budgets. Blinkit expects vendors to participate in marketing campaigns, flash sales, and festive promotions. This typically requires depositing money into a promotional wallet, often ₹25,000-50,000 to start. This money funds your participation in campaigns like “Deals of the Day” or category-specific promotions. You’ll also discuss co-marketing opportunities where Blinkit features your products prominently in return for additional budget contributions.
Return to Vendor (RTV) policies need clear agreement. What happens when products don’t sell before expiry? Who bears the cost of damaged products? What’s the acceptable quality rejection rate? Typically, fresh products have RTV agreements where you buy back products nearing expiry. Packaged products usually don’t have RTV, but quality rejections above 2-3% may result in deductions from your payments.
Payment terms determine your cash flow. Most quick commerce platforms operate on weekly or bi-weekly payment cycles. You ship products to their warehouse, they sell to customers, and you receive payment 7-14 days later after deducting commissions and any applicable charges. Negotiate for the shortest payment cycle possible to improve your cash flow.
Your launch cities and rollout plan come next. Your Category Manager will recommend starting in specific cities based on where your products have the best fit. You might launch in Bangalore and Delhi first, prove success, then expand to Mumbai, Hyderabad, Pune, and other cities. Each new city requires APOB registration for that state, so this rollout happens in phases.
Everything discussed in these negotiations should be documented in your vendor agreement. Don’t rely on verbal agreements. Get the commercial terms, payment cycles, commission rates, RTV policies, and all other critical elements in writing before you commit inventory and start supplying.
📌 Stage 4: The APOB Registration Process
If you want to supply Blinkit dark stores in multiple states, APOB registration becomes mandatory. This is a GST requirement that trips up many first-time quick commerce vendors, so let me explain it clearly.
When you first register for GST, you get a GSTIN for your primary place of business in your home state. If you want to supply products to business locations in other states, you need to register those states as additional places of business. Each APOB gets a separate GSTIN with a different state code.
Here’s why this matters: when Blinkit generates a purchase order for their Delhi warehouse, that purchase order is generated from a Delhi GSTIN. If you only have GST registration in Maharashtra, you cannot legally supply that Delhi warehouse. You need Delhi APOB registration. When they generate a purchase order from their Bangalore warehouse, you need Karnataka APOB.
The registration process:
- Log into your GST account on the GST portal
- Go to Registration → Amendment of Registration → Additional Place of Business
- Provide the address where you’ll be warehousing goods or conducting business in that state (this can be your distributor’s address or a rented warehouse space)
- Submit required documents: proof of address, ownership documents if applicable, board resolution authorizing APOB, identity and address proof of authorized signatory
- Wait for approval (typically 2-4 weeks, though it varies by state)
Once you receive APOB approval, inform Blinkit and provide the new GSTIN certificates. Blinkit updates their system with your new APOB locations, and only then can they generate purchase orders for warehouses in those states.
Many vendors work with CA firms or GST consultants to handle APOB registrations, especially when registering in multiple states simultaneously. The cost is typically ₹2,000-5,000 per state for professional assistance. While you can do it yourself, having professional help ensures proper documentation and faster approval.
Pro tip: Start your APOB process as soon as you know which cities you’ll be supplying. Don’t wait until Blinkit is ready to launch your products in a new city—the GST registration delay will push back your entire launch timeline.
📌 Stage 5: Product Listing Through NPI Process
Unlike traditional marketplaces where you directly create product listings through a seller dashboard, Blinkit uses a New Product Introduction (NPI) process managed by your Category Manager. You don’t have direct access to list products yourself—everything goes through your Category Manager, which ensures quality control but also means the process takes longer.
Once commercial terms are agreed and documentation is complete, your Category Manager initiates the NPI process. You’ll receive a product data template, usually an Excel file with specific columns for each data field. Fill this template with extreme attention to detail because errors cause delays.
Essential product information includes:
- Product name: Clear and descriptive (example: “Britannia Good Day Butter Cookies 200g” rather than vague names)
- Brand name and official category/sub-category
- UPC or EAN barcodes: Mandatory for each SKU—if your product doesn’t have a barcode, generate one before proceeding
- Detailed description: 100-200 words covering what the product is, key features, benefits, and usage instructions
- Ingredients list: For food items, listed in order of proportion
- Nutritional information: Per 100g or per serving for food products
- Technical specifications: Relevant to your category
- Pricing: MRP (must match printed packaging) and your suggested selling price
- Shelf life: From manufacturing date, with commitment to supply products with minimum remaining shelf life
- Pack size and weight: Be specific (200g pack, bundle of 6 units, 1 liter bottle)
High-quality images are crucial:
You need product images from multiple angles. Front-facing pack shot showing the brand and product name clearly, back-facing shot showing ingredients or specifications, nutritional information panel for food items, and any special certifications or quality marks. Each image should be at least 1000×1000 pixels, in JPG or PNG format, on plain white background, well-lit with no shadows, and showing the actual product.
Some vendors hire professional product photographers who specialize in ecommerce. The cost is typically ₹500-1,500 per SKU for quality images. This investment pays off in higher conversion rates—poor images lead to low sales even when your products are good.
Submit the completed product data template and images to your Category Manager. They review everything, provide feedback on any issues, and then initiate the backend listing process. The technical team creates listings in Blinkit’s catalog system, matching your products to their internal category structure. This listing creation process takes 7-10 days typically. You’ll receive a notification when products are live in the system, though they won’t be visible to customers yet—that happens only after you complete inventory dispatch to their warehouses.
📌 Stage 6: Getting Physical Inventory Into the Network
With products listed in the system, you’re ready for the crucial step of getting physical inventory into Blinkit’s network. This is where the dark store model becomes operationally real.
Based on the inventory commitments you made during commercial negotiations, Blinkit generates purchase orders for your products. Each PO specifies the warehouse location, products required, quantities, delivery date, and your agreed pricing. Review these POs carefully to ensure everything matches your agreement before accepting.
Inventory preparation and shipping:
Products should be in proper commercial packaging with clear labeling showing product name, MRP, batch number, manufacturing date, expiry date, and your company details. If shipping multiple SKUs together, clearly mark cartons with contents. Generate invoices for each PO exactly as specified—the invoice must show the correct warehouse GSTIN, your APOB GSTIN for that state, itemized products with HSN codes, applicable GST rates, and total amounts.
Ship products to the specified warehouse address using a reliable logistics partner. Blinkit doesn’t provide pickup services for initial shipments—you arrange transportation. Use transporters who provide proof of delivery and cargo tracking.
Warehouse acceptance:
The warehouse receives your products, scans barcodes, matches against the PO, checks product quality, verifies expiry dates, and accepts inventory into their system. This process takes 24-48 hours. If there are quality issues, damaged products, or products below minimum shelf life requirements, those units get rejected. You receive a rejection report and must arrange to collect rejected inventory at your cost.
Once accepted at the warehouse, Blinkit’s internal distribution system takes over. They have sophisticated algorithms that predict which dark stores will need how much of each product based on historical sales data, seasonal trends, neighborhood demographics, and current inventory levels. They automatically allocate your products to dark stores without your involvement.
Your product becomes live on the app in neighborhoods where dark stores have received inventory. Customers in those areas can now order your products. From this point forward, maintaining inventory becomes your ongoing responsibility. Blinkit continuously monitors sales and stock levels. When inventory drops below thresholds, they generate new POs. You need to fulfill these promptly to maintain availability—running out of stock damages your visibility and sales momentum significantly.
How to Sell on Zepto: A Faster Path With Better Tools
Zepto’s vendor registration process shares similarities with Blinkit but offers some key advantages that make it particularly attractive for smaller brands or those seeking faster market entry. The most significant difference is Zepto’s Seller Hub, which provides direct access to manage your products, inventory, and performance without constant Category Manager coordination.
👨🏻💻 The Registration and Approval Process
Begin by visiting Zepto’s Partner Registration page, typically found under “Partner with Zepto” or “Sell on Zepto” sections. The initial application form is straightforward—provide your business details exactly as they appear in official documents, enter contact information that will be verified with OTP, and select your primary product categories.
Unlike Blinkit where everything is Category Manager-driven, Zepto’s process gives you more direct access. After submitting your application with preliminary documents (GST certificate and business registration proof), you typically receive a response within 3-5 business days. If approved for the next stage, you get login credentials for the Zepto Seller Hub along with instructions for completing your documentation.
The Seller Hub is Zepto’s vendor portal where you’ll manage your entire relationship with the platform. This is a significant advantage—you get direct access to upload products, manage inventory, track sales, and monitor performance rather than going through account managers for every small change. The interface is relatively intuitive, with clear sections for different functions, though taking time to familiarize yourself with all features pays off.
📝 Documentation Requirements and Verification
The documentation requirements are similar to Blinkit, but the submission process happens through the Seller Hub rather than email exchanges with a Category Manager. You’ll need all the standard documents: valid GST registration certificate, business registration proof, PAN cards, bank account details with canceled cheque, FSSAI license for food products, brand authorization letters if applicable, and product images meeting quality standards.
Zepto’s document upload interface provides clear guidelines for each document type, including file format requirements (PDF), size limits (under 5MB), and quality expectations. One helpful feature is that the system provides immediate feedback if your uploaded file doesn’t meet technical requirements, so you can fix issues before submission rather than waiting days for rejection notices.
The verification process takes 7-10 business days after you submit complete documentation. Zepto’s compliance team reviews everything, verifies certificates with issuing authorities, and checks for any red flags. If documents are incomplete or unclear, you’ll receive specific feedback through the Seller Hub on what needs correction. This direct feedback loop is faster than email chains with Category Managers.
🏷️ Direct Product Listing Through Seller Hub
Once your account is verified, you can begin creating product listings directly through the Seller Hub without waiting for Category Manager assistance. This self-service capability significantly speeds up the listing process and gives you more control over how your products appear.
The product listing interface walks you through each required field: product name, brand, category and sub-category selections from dropdown menus, UPC or EAN barcode entry, product description, images upload, pricing information (MRP and selling price), specifications relevant to your category, shelf life and minimum supply commitment, pack size and weight details.
Product description best practices:
Write clear, concise descriptions that start with the most important information. Describe what the product is and its key benefit in the opening sentence. Then cover ingredients or composition, usage instructions if relevant, storage recommendations, and any dietary or allergen information. Keep descriptions between 100-200 words for quick reading while remaining informative.
Image requirements remain similar:
You need high-resolution images (minimum 1000×1000 pixels) in JPEG or PNG format, shot against plain white backgrounds with good lighting. Multiple angles showing product front, back, ingredients panel, and any certifications. The Seller Hub provides image preview functionality so you can see how your images will appear to customers before finalizing listings.
After completing all fields, save your listing as draft and review everything carefully. Check for typos, verify all information is accurate, and ensure images are clear and professional. Once satisfied, submit for approval. Zepto’s catalog team reviews your listing for quality, accuracy, and compliance, checking that images are appropriate, descriptions are accurate, product information is complete, and everything meets their listing standards. This approval typically takes 2-3 business days.
Approved products appear in your Seller Hub with “Active” status, but they won’t be visible to customers until you dispatch inventory to Zepto’s warehouses and stock is allocated to dark stores.
📦 Inventory Management and Fulfillment
The inventory management process follows similar patterns to Blinkit but with better visibility through the Seller Hub. Zepto generates purchase orders based on their demand forecast and your committed supply capability. You’ll see POs in the “Orders” section of your dashboard, with each PO specifying products, quantities, delivery location, expected delivery date, and pricing.
Review POs promptly and confirm you can fulfill them by the requested date. If there are issues, communicate immediately through the Seller Hub messaging system rather than accepting the PO and then failing to deliver. Once you accept a PO, prepare inventory following the same quality standards: retail-ready packaging with all required labels, clear marking of contents for multi-SKU shipments, proper invoicing matching the PO exactly.
Ship to Zepto’s warehouse location using your logistics partners. At the warehouse, Zepto’s receiving team scans products, matches them against the PO, verifies quality, checks expiry dates, and accepts inventory into their system within 24-48 hours. You can track acceptance status directly in the Seller Hub.
Accepted inventory enters Zepto’s distribution network, where algorithms automatically distribute products to dark stores based on demand patterns. Your products become visible on the Zepto app in neighborhoods where dark stores have stock. The Seller Hub provides real-time visibility into inventory levels across locations, sales velocity by SKU, low-stock alerts, and performance metrics.
One significant advantage: Zepto operates on weekly payment cycles compared to Blinkit’s typical bi-weekly schedule. This weekly cash flow can significantly benefit smaller businesses managing tight working capital. Payments go directly to your registered bank account with clear breakdowns of sales, commissions, and deductions visible in your Seller Hub.
The Real Cost of Selling: Commission Structure and Hidden Expenses
Understanding the complete cost structure of selling on quick commerce platforms is essential for determining whether the channel is profitable for your products. The commission rates you see quoted are just one component of total costs, and many vendors are surprised by the additional expenses that chip away at margins.
Breaking Down Platform Fees
Both Blinkit and Zepto charge commission as a percentage of the selling price, not the MRP. If your product has an MRP of ₹100 but sells for ₹80, the commission is calculated on ₹80. The commission rate varies significantly by category, typically ranging from 10% for groceries and staples up to 18% for personal care and beauty products.
But the visible commission is only the starting point. On top of the base commission, platforms add 18% GST on the commission amount itself. So if your commission is ₹10, you actually pay ₹11.80 after GST is added. Additionally, the government requires ecommerce platforms to collect 1% TCS (Tax Collected at Source) on the total selling price for most sellers. This is deducted from your payment and can eventually be claimed as advance tax, but it affects your immediate cash flow.
Let’s walk through a real example:
Imagine you’re selling a snack pack with ₹100 MRP at ₹85 selling price. The category commission is 15%. Your manufacturing cost is ₹40 per unit.
Selling Price: ₹85.00
Platform Commission (15% of ₹85): -₹12.75
GST on Commission (18% of ₹12.75): -₹2.30
TCS (1% of ₹85): -₹0.85
───────────────────────────────────
Net Payment You Receive: ₹69.10

Your Costs:
Manufacturing/Sourcing: ₹40.00
Packaging (retail-ready): ₹3.00
Logistics to warehouse: ₹2.00
Returns (amortized average): ₹1.00
───────────────────────────────────
Total Costs: ₹46.00

Net Profit Per Unit: ₹23.10
Profit Margin: 27.2%
At first glance, 27% margin seems healthy. But now factor in the hidden costs that many vendors overlook.
The Hidden Costs That Erode Margins
APOB registration and compliance adds up quickly. Each state registration costs ₹2,000-5,000 if you use professional help. If you’re supplying five states, that’s ₹10,000-25,000 in setup costs alone, plus ongoing GST filing costs for each APOB location.
Promotional investments are essentially mandatory for gaining visibility. Platforms expect vendors to participate in marketing campaigns and flash sales. Initial wallet deposits of ₹25,000-50,000 are common. While this money funds your campaigns, it still represents working capital locked up. When you run promotions, you’re offering deeper discounts plus paying for advertising placement, which can make individual campaigns unprofitable even if they generate volume.
Product photography is a one-time cost but necessary. Professional images for your catalog cost ₹500-1,500 per SKU. If you’re listing 20 products, that’s ₹10,000-30,000 upfront investment. Quality matters—poor images directly correlate with low conversion rates.
Quality rejection and return logistics eat into margins. Even with a 2-3% rejection rate, collecting rejected inventory from multiple warehouse locations costs money in transportation. Returns from customers happen too, and while quick commerce has lower return rates than traditional ecommerce, they’re not zero. Each return involves logistics costs and potential product loss if the returned item isn’t resaleable.
Inventory holding costs rise significantly in quick commerce. Instead of maintaining inventory in one central location, you’re effectively holding stock in multiple states simultaneously. The working capital requirement increases proportionally. If you previously maintained ₹5 lakh in inventory, you might need ₹15-20 lakh to support the same sales volume across multiple quick commerce warehouse locations.
When you account for all these costs, that initial 27% margin might shrink to 18-20% actual profit margin. This doesn’t mean quick commerce is unprofitable—it means you need to plan with realistic cost expectations rather than just looking at platform commission rates.
Strategies That Separate Winners From Strugglers
Getting listed on Blinkit and Zepto is just the first step. Success requires ongoing optimization of listings, disciplined inventory management, responsive customer service, and smart promotional strategies. Let me share what actually works based on brands that are thriving in quick commerce.
Product Listing Optimization That Drives Conversions
Your product listing is your only salesperson in quick commerce. Customers make decisions in seconds based on what they see in the app, so every element matters.
Images make or break your conversion rate. Professional photography isn’t optional—it’s essential. Your primary image should show the entire product front-facing with brand name and key information clearly visible. The image needs to be instantly recognizable even as a small thumbnail in search results. Additional images should show the back of pack with ingredients or specifications, nutritional information panels for food items, and any certifications or quality marks that build trust.
Many successful vendors invest ₹500-1,500 per SKU for professional product photography. If you’re handling it yourself, use a phone tripod, shoot in natural daylight near a window, and use a white bedsheet or poster board as backdrop. The key is consistency—all your products should be photographed with similar lighting, angles, and backgrounds to build professional brand presence.
Product titles need strategic keyword inclusion while remaining natural. Instead of just “Cookies 200g,” successful vendors use titles like “Brand Name Butter Cookies | Crunchy & Delicious | 200g Pack.” This includes brand name (some customers search by brand), product type (cookies), key attribute that differentiates you (butter, crunchy), and size. The title should read naturally while incorporating terms customers actually search for.
Descriptions should be concise but complete. Start with the most important information—what the product is and its key benefit. A customer should understand within the first sentence why they might want this product. Then cover ingredients or composition, usage instructions if relevant, storage recommendations, and any dietary or allergen information. Keep descriptions under 200 words for quick reading while still being informative.
Pricing strategy affects both visibility and conversion, but it’s more nuanced than just being the cheapest. Customers using quick commerce are paying for convenience and speed, not just low prices. Being ₹2-5 more expensive than a competitor won’t significantly hurt conversions if your images and description are better. However, being 20% more expensive without clear justification will. Research 3-5 similar products in your category and price within that competitive range.
Inventory Management That Prevents Stock-Outs
Running out of stock is the fastest way to kill momentum on quick commerce platforms. The algorithms actively deprioritize products that frequently show “out of stock” status because platforms want to show customers only products they can actually order. Even a 24-hour stock-out can set you back weeks in visibility recovery.
Successful vendors follow what I call the 15-Day Buffer Rule: always maintain minimum 15 days of inventory at your current sales velocity. This isn’t just having 15 days of stock on paper—it’s having that inventory actually accepted in warehouses and distributed to dark stores. Calculate your daily sales velocity for each SKU, multiply by 15, and that’s your minimum inventory threshold before reordering.
Implement a daily monitoring routine. Check stock levels first thing each morning across all locations you supply. Review the previous day’s sales to identify any unusual spikes or trends. Set up automatic alerts when any SKU drops below 10 days of remaining inventory. Weekly, analyze broader trends to understand if certain products are accelerating or declining, which informs your production planning.
Quality control before dispatch is non-negotiable. Every batch you send to platforms should be checked for quality issues. Ensure products have minimum required shelf life remaining (typically 3 months, preferably 6 months for better rotation). Verify packaging is intact with no damages. Label temperature-sensitive products appropriately. A quality rejection not only loses you that inventory but also damages your vendor rating, which affects future order allocation.
Plan for seasonal demand fluctuations proactively. Summer months see higher sales of beverages, cold products, and cooling personal care items. Festival seasons create spikes across categories as customers stock up. Winter affects fresh produce and certain food categories. Monsoon drives demand for snacks, hot beverages, and immunity boosters. Build inventory ahead of these predictable patterns rather than reacting after demand spikes.
Smart Promotional Strategy That Actually Drives Profit
Advertising and promotional placements accelerate your growth, but they need to be profitable, not just generate volume. Too many vendors celebrate sales numbers without tracking whether promotions actually made money.
Sponsored search placements are the most direct form of advertising. When customers search for keywords related to your product, your sponsored listing appears at the top of results. You typically pay per click or per impression. Start with broad category keywords like “organic snacks” or “protein bars” to understand what drives traffic. Then narrow to more specific searches like “sugar-free protein bars” or “keto-friendly snacks” based on what actually converts.
Category page banners give prominent visibility to customers browsing specific sections. If you sell personal care products, appearing at the top of the personal care category page drives significant discovery. These placements usually require advance booking and minimum investment amounts ranging from ₹5,000-20,000 per day depending on the category’s traffic.
Flash sale participation can accelerate velocity dramatically. When platforms run daily deals or limited-time sales, participating products get massive visibility. Yes, you’ll offer deeper discounts (typically 20-30%) and pay promotional fees, but the volume spike often justifies it. Flash sales also generate customer reviews quickly, which is crucial for new products building social proof.
Track promotional ROI religiously. After each campaign, calculate your cost per order, average order value, total revenue generated, your margin on that revenue, and net profit or loss. A promotion that generates ₹50,000 in sales might sound successful until you realize you spent ₹15,000 on advertising, offered ₹12,000 in discounts, and made ₹20,000 in gross profit—leaving you with a net loss of ₹7,000. Adjust future campaigns based on these learnings.
Customer Service That Builds Loyalty
Quick commerce customers have high expectations. They expect perfect products delivered in perfect condition within 10 minutes. When something goes wrong, your response determines whether that customer orders from you again.
Monitor customer ratings and reviews weekly through your dashboard or reports from your account manager. Every product rating matters—aim to maintain 4.5+ stars consistently. Read both positive and negative reviews because they contain valuable insights. Positive reviews tell you what customers love about your products, which you should emphasize in marketing. Negative reviews identify issues you need to fix immediately.
Respond to negative feedback within 24 hours. Most platforms allow vendor responses to reviews. Use this opportunity to address concerns professionally, apologize for any issues, and show that you take customer experience seriously. Even if you can’t change that specific reviewer’s opinion, other potential customers see your responsiveness and care.
Address systemic quality complaints immediately. If you see multiple customers mentioning the same issue—like “product was stale” or “packaging was damaged”—investigate your supply chain that same day. One bad batch can generate dozens of negative reviews before you catch it. Sometimes the issue isn’t your manufacturing but how products are being handled in dark stores. Work with your platform contact to identify and fix the problem.
Common Mistakes That Sabotage Success
Learning from others’ failures saves you time, money, and frustration. Here are the mistakes that trip up most first-time quick commerce vendors, along with how to avoid them.
❌ Rushing Through Documentation
Approximately 70% of vendor applications get rejected or significantly delayed on first attempt due to documentation issues. The problem isn’t that businesses lack the required documents—it’s that they submit poor-quality scans, incomplete forms, or documents with mismatched information.
The most common documentation mistakes:
Business names that don’t match across different documents. Your GST certificate says “ABC Enterprises Private Limited” but your bank account is in the name “ABC Enterprises Pvt Ltd”—this mismatch causes rejection even though it’s the same business. Standardize your business name exactly across all documents before applying.
Blurry or poorly lit scans happen when vendors photograph documents on their phone in bad lighting or use low-resolution settings. Platforms increasingly use automated systems to scan and verify documents, and these systems can’t read blurry text. Take high-quality scans or photographs in good lighting with all information clearly visible.
Expired certificates are surprisingly common. Vendors check their FSSAI license during application and discover it expired two months ago. Or their GST return filings aren’t current, showing inactive status. Check expiration dates and compliance status for all certificates before starting your application. If something expires within 3 months, renew it first.
The fix: Create a complete documentation folder before starting your application. Scan or photograph every required document in good lighting, save as clear PDFs under 5MB, verify all business names match exactly, check all expiration dates, and confirm GST returns are filed and status is active. This preparation takes one day but prevents weeks of delay.
❌ Underestimating APOB Requirements
Many vendors plan to supply products to dark stores in five different states but only have GST registration in their home state. They assume they can add other states later or don’t realize APOB registration is mandatory. This creates significant launch delays because APOB registration takes 2-4 weeks per state, and you cannot supply a state’s warehouses without the appropriate APOB registration completed.
The impact cascades: You commit to your Category Manager that you’ll launch in Delhi, Mumbai, and Bangalore simultaneously. But you only have Maharashtra GST. You now need Delhi and Karnataka APOB registrations, which take 6-8 weeks to complete. Your launch timeline pushes back by two months. Meanwhile, your Category Manager has made plans based on your committed timeline, and the delay affects their quarterly targets. Your relationship starts on a negative note.
The fix: List your target cities and states upfront during your very first Category Manager discussion. Start APOB applications immediately, even before your vendor agreement is finalized. Use a CA firm or GST consultant for faster, more reliable processing—the ₹2,000-5,000 per state cost is worth it compared to the revenue delay from trying to handle it yourself. Budget ₹10,000-25,000 for APOB registrations across five states and factor this into your total launch costs.
❌ Neglecting Product Photography Quality
Your product image is often the only thing a customer sees before deciding whether to add your product to cart or choose a competitor’s. Poor photography directly kills sales, yet many vendors use bad phone photos taken in poor lighting with cluttered backgrounds.
I’ve seen vendors with excellent products struggle because their images show products photographed on busy kitchen countertops, in dim warehouse lighting, or at weird angles that don’t show the product clearly. Meanwhile, competitors with similar or even inferior products convert better because they invested ₹1,000 in professional photography.
The fix: Either hire a professional product photographer (₹500-1,500 per SKU) or invest in basic equipment for DIY photography: a phone tripod costs ₹500-1,000, a white backdrop poster board or bedsheet costs ₹200-500, and natural daylight near a window is free. Photograph all products with consistent lighting, angles, and backgrounds. Show multiple angles including front, back, sides, and any important information panels. The investment of ₹10,000-20,000 for professional images across your initial catalog pays for itself within weeks through higher conversion rates.
❌ The “Reorder When Empty” Trap
Many vendors wait until inventory is completely depleted before reordering. This creates a predictable and damaging cycle. Stock runs out, the platform removes your product from visibility, you manufacture and ship new inventory, warehouses accept and distribute it, products return to stock but ranking is damaged, and you spend 2-3 weeks slowly rebuilding visibility. Meanwhile, competitors have captured customers who searched for products like yours while you were out of stock.
The numbers tell the story: A product selling 50 units daily with good visibility goes out of stock. During the 7 days it takes to replenish, you lose 350 sales. When products return, the algorithm shows them to fewer customers because of the stock-out history. Sales restart at 30 units daily instead of 50. It takes 2-3 weeks to rebuild to previous velocity. You’ve lost approximately 1,000 units of sales (350 during stock-out + 650 during slow recovery) because you didn’t maintain buffer inventory.
The fix: Maintain 15-20 days of buffer inventory always. Reorder when stock drops to 10 days remaining, not when it reaches zero. Set automatic alerts in your inventory management system. Have fast-track production capability or backup suppliers for emergencies. Yes, this increases working capital requirements, but the cost of lost sales and damaged rankings is far higher than the cost of carrying extra inventory.
Choosing Between Blinkit and Zepto: A Decision Framework
Most successful vendors eventually sell on both platforms plus others like Swiggy Instamart. But when starting out, focusing on one platform first simplifies operations and concentrates your learning. Here’s how to decide which platform deserves your priority.
When Blinkit Makes More Sense
Choose Blinkit as your first platform if you’re an established FMCG or D2C brand with existing market presence and recognition. Blinkit’s larger market share (41%) means more potential customers and higher volume potential. Established brands often find it easier to negotiate favorable commercial terms with larger platforms because the platform wants recognized brands in their catalog.
Blinkit also fits better if you’re focusing primarily on tier-1 cities where Blinkit has stronger penetration. Mumbai, Delhi, Bangalore, Hyderabad, and Chennai are Blinkit’s strongholds. If your target customers live in these metros and you’re not prioritizing tier-2/3 cities initially, Blinkit’s coverage matches your strategy.
You’ll succeed on Blinkit if you can meet higher volume requirements. Blinkit’s larger scale means they expect and can absorb higher inventory commitments. If you have strong supply chain capability and want to scale quickly to 10,000+ units monthly, Blinkit provides the customer base to support that growth.
Blinkit makes sense when you have allocated ₹1 lakh or more for promotional activities. Their advertising and promotional ecosystem is more developed with more placement options, but it also requires larger wallet deposits and campaign budgets. If you’ve planned significant marketing investment, Blinkit’s tools can deploy that budget effectively.
When Zepto Becomes the Better Choice
Choose Zepto as your first platform if you’re a smaller brand or regional player testing quick commerce viability without massive upfront commitments. Zepto’s slightly more flexible onboarding and willingness to work with emerging brands makes entry easier. You can prove the quick commerce model works for your products without overextending on inventory or promotional budgets.
Zepto’s faster timeline matters when you need to launch quickly. Their 30-45 day onboarding versus Blinkit’s 45-60 days can make a difference if you’re racing to launch before a seasonal peak or have committed to customer/investor timelines. Every week matters when you’re trying to capture festival season demand or meet quarterly revenue targets.
The Seller Hub advantage appeals to vendors who prefer direct control over their operations. If you want to adjust pricing quickly, monitor performance in real-time, update inventory without emailing account managers, and have hands-on control over your catalog, Zepto’s self-service tools are superior. This is particularly valuable for smaller teams that can’t dedicate someone to managing platform relationships full-time.
Zepto works well for products that are unique, exclusive, or highly differentiated. Zepto actively seeks products that make their catalog distinctive. If you have items not widely available elsewhere, Zepto might offer better commercial terms or promotional support to secure exclusivity or preferential positioning.
The Smart Sequencing Strategy
The most successful approach isn’t choosing one platform forever—it’s sequencing your expansion intelligently.
🕒 Phase 1 (Months 1-3): Master one platform. Choose based on your strengths and the factors above. Focus on 5-10 hero SKUs that represent your best products. Learn the operational requirements, build robust inventory management systems, establish quality control processes, and achieve consistent profitability. Trying to do everything at once spreads you too thin and prevents you from doing anything well.
🕒 Phase 2 (Months 4-6): Optimize and expand. Once you’re stable on your first platform, expand your SKU range gradually. Add new products every 4-6 weeks rather than launching everything simultaneously. Expand to additional cities as APOB approvals come through. Test different promotional strategies to understand what drives profitable growth versus just volume. Build your review base and ratings to strengthen organic visibility.
🕒 Phase 3 (Months 7+): Add the second platform. By now you understand quick commerce operations, know which products work, have established supply chain processes, and are generating consistent cash flow. Onboarding the second platform is much faster because you know what to expect. You can reuse the same product images, descriptions, and much of the documentation. Managing inventory across two platforms requires better planning but isn’t overwhelming when you’ve mastered one first.
This sequencing approach lets you learn without drowning in operational complexity, build financial reserves before expanding, develop systems that work before adding more platforms, and leverage initial success to negotiate better terms on your second platform.
Your Path Forward: Taking Action
Quick commerce has evolved from an experimental model to an essential distribution channel for consumer brands in India. With platforms adding thousands of dark stores and the market projected to reach $26 billion by 2028, the opportunity has never been larger. But success requires approaching it with realistic expectations, proper preparation, and sustained operational discipline.
If you’re ready to start, begin with documentation preparation. Gather your GST certificates, business registration, FSSAI license (if applicable), PAN cards, bank account details, and brand authorization letters if needed. Ensure all documents are clear, current, and show consistent business names across everything.
Plan your APOB registrations for the states where you want to supply products. Don’t wait until platforms ask for these—start the process immediately because it takes 2-4 weeks per state. Prioritize states with your target cities: Delhi for NCR coverage, Maharashtra for Mumbai and Pune, Karnataka for Bangalore, Telangana for Hyderabad.
Invest in product photography before applying. Budget ₹500-1,500 per SKU for professional images or invest in basic equipment (tripod, lighting, white backdrop) for DIY photography. Quality images directly impact your conversion rates once you’re live.
Choose your first platform based on your brand position, target cities, budget capacity, and preference for Category Manager guidance versus self-service tools. Both paths work—pick the one that matches your strengths.
Set realistic timeline expectations. You’re looking at 45-60 days for Blinkit or 30-45 days for Zepto from application to products being live. Plan your inventory production, marketing campaigns, and revenue projections around these timelines, not optimistic hopes of being live in two weeks.
Most importantly, track actual profitability, not just sales volume. Calculate your true margin after all platform fees, promotional costs, packaging expenses, and logistics. Some products that seem profitable might actually lose money once you account for everything. Focus on products and strategies that deliver sustainable profit margins, not just impressive revenue numbers.
The brands winning in quick commerce are those that treat it as a strategic channel requiring dedicated attention and disciplined execution, not just another place to list products and hope for the best.
We’re not just quick commerce consultants. Our ecommerce solutions cover marketplace management across Amazon, Flipkart, and other platforms. Our performance marketing services drive profitable growth across Google Ads, Meta platforms, and other paid channels. This integrated approach means we help you build a comprehensive digital distribution strategy, not just quick commerce in isolation.
Schedule a Free Quick Commerce Strategy Consultation →
Note:
This comprehensive guide was created by the team at Digital Dawn, an ecommerce and performance marketing setup based in Indore. We specialize in marketplace management, quick commerce consulting, and digital advertising for consumer brands across India. We believe in sharing knowledge openly because educated brands make better partners, which is why we invest time in creating detailed guides like this to help Indian businesses make informed decisions about their distribution and growth strategies.